5 Best Anti-Virus for Windows 7


1. BitDefender

BitDefender Antivirus 2010 offers the most trustable security and protection among all antivirus software out there and that is why it is rated # 1 antivirus by most of the sites.
bit+defender 10 Best Anti Virus for Windows 7
BitDefender Antivirus 2010 offers rock-solid security, simple usability, effective use of resources, and a valuable price tag, BitDefender Antivirus 2010 adds some additional features that continue to improve overall PC performance and protection and peace of mind, without upsetting your PC performance or paycheck.

2. Norton Antivirus

Symantec’s Norton AntiVirus 2010 and Norton 360 Version 3.0 are two security solutions. It is scheduled on Microsoft’s list of most compatible software solutions for Windows 7.
Norton+Antivirus 10 Best Anti Virus for Windows 7
Norton Internet Security 2010 and Norton AntiVirus 2010 have been specifically designed to support Windows 7. Those with Norton AntiVirus 2009 would receive automatic upgrade to Norton Antivirus 2010.

3. Kaspersky Antivirus

This anti-virus isn’t freeware, its about 60 dollars, but there is a 30 day free trial after downloading the client.
Kaspersky 10 Best Anti Virus for Windows 7
Kaspersky AV is a mixed box:
1. Even after all the updates Kaspersky AntiVirus still lacks some valuable features compared to the other anti-viruses.
2. The new version has removed it best feature, the Safe Run program sandbox, where you can use the anti-virus even in Safe Mode.
3. On the other hand it has added a better anti-virus engine, which runs at blazing speed compared to the free edition anti-viruses.
4. A new feature allow customers to send their PC’s scans for analysis for better protection. However, this costs an extra $20.
Would recommend using the trial and seeing whether you like it before committing to this anti-virus.But you can also activate it using KEYS.

4. McAfee

McAfee Total Protection provides full Suite of products for Windows 7. For those already using Windows 7 Beta with McAfee will receive an upgrade to MTP 3.11 for Security Center, Virus Scan and Personal Firewall.
One of the oldest security software providers, McAfee combines the best of anti-virus, firewall, and intrusion prevention technology.

5. AVG

AVG is one of the most widely used anti-virus solution that works perfectly under Windows 7. AVG offers comprehensive protection against malicious threats.
AVG 10 Best Anti Virus for Windows 7
AVG is a light-weight but effective antivirus offers protection against viruses, worms and trojans, spyware, adware and identity-theft.



Aircel Customer Care Toll Free Numbers In India

Aircel Customer Care Number helps you get  instant Customer Care Services from Aircel Customer Care. You can call Aircel Customer Care Number-cum-Aircel Toll Free Number and seek immediate solutions to your queries and concerns regarding the services of the company. We have mentioned Aircel Customer Care Number below using which you can get maximum information regarding services recently launched by the Telecom giant Aircel India

Read Also: http://youngsterstuff.blogspot.in/2012/06/tata-docomo-customer-care-toll-free.html


Aircel Customer Care Number :  +91 9716012345 or 121 from any Aircel phone.
Aircel Toll Free Number :Call 121 toll free automated response for enquiry. Call 198 toll free for complaints and service activation & deactivation.
Following are the Regions wise contact numbers along with the customer support Email address of the company that you can write to for any queries.
Aircel Customer Care Number Andhra Pradesh:
Prepaid & Postpaid : 9700012345 / E-mail: care.andhrapradesh@aircel.co.in
Assam:
Postpaid: 9854098540
Prepaid: 9854012345
E-mail: care.assam@aircel.co.in
Bihar:
Prepaid: 9852012345
E-mail: care.bihar@aircel.co.in
Chennai:
Postpaid: 98410 12345
Prepaid: 98410 56789
E-mail: talktoaircel@aircel.co.in
Delhi:
Prepaid / Postpaid: 9716012345
E-mail: care.delhi@aircel.co.in
Himachal Pradesh:
Prepaid: 9857012345
E-mail: care.hp@aircel.co.in
Karnataka
Prepaid: 9738012345
E-mail: care.karnataka@aircel.co.in
Kerala:
Prepaid: 9809012345
E-mail: care.kerala@aircel.co.in
Kolkata:
Prepaid: 9804012345
E-mail: care.kolkata@aircel.co.in
Mumbai:
Prepaid / Postpaid: 9768012345
E-mail: care.mumbai@aircel.co.in
Maharashtra:
Prepaid / Postpaid: 9762012345
E-mail: care.maharashtra@aircel.co.in
Orissa:
Postpaid: 9853098530
Prepaid: 9853012345
E-mail: care.orissa@aircel.co.in
UP East:
Prepaid / Postpaid: 9807012345
E-mail: care.upeast@aircel.co.in
UP West:
Prepaid / Postpaid: 9808012345
E-mail: care.upwest@aircel.co.in
Tamil Nadu:
Postpaid: 98422 12345
Prepaid: 98420 12345
E-mail: care.tn@aircel.co.in
Aircel Head Office contact Details
Address: A – 44, Mohan Coperative Industrial Estate, Mathura Road, Delhi
Contact Number: 
011 – 26990095
Website: 
www.aircel.com

Top 5 Sites To Learn HTML and CSS Online For Free


Want to learn HTML and CSS coding for free than you are in the right place to know from where to learn HTML and CSS languages and coding for free.

People who wants to learn HTML and CSS coding they spend and give too much money in online or offline. So today I will share with you the Top 10 site where you can learn HTML and CSS coding for free.Take a look at below these sites.

1.w3schools 


w3schools1 Top 10 Sites To Learn HTML and CSS Online For Free


W3Schools is one of the best site to learn HTML and CSS languages for free, moreover this site can teach you all other programming languages also.


2.w3schools.com/html5 


w3schools2 Top 10 Sites To Learn HTML and CSS Online For Free
Again W3Schools which teach you HTML5 languages, coding and more.


3.learncss.tutsplus.com 


learncss3 Top 10 Sites To Learn HTML and CSS Online For Free
This site will also teach you HTML and CSS online for free.The one of the best thing is they will teach you HTML and CSS in 30days by spending only 10 minutes a day.This course has 30 videos.


4.webdesign.about.com 


about4 Top 10 Sites To Learn HTML and CSS Online For Free


One of the most popular site to About.com also teach you HTML and CSS online for free.This site has too many tutorials to learn HTML and CSS.

How to Convert Free PDF to JPG Online

Do have a PDF File which you want to convert them into JPG File but you don’t have any source or not find any good site to do that, than I simplyrecommend you to visit - PDF to JPG where you can Convert Free PDF to JPG  JPG, nothing to download, no registration, no watermark.It simply the best.

How to Convert Free PDF to JPG Online

1.First Visit PDF to JPG Free Online Converter Site.

2.Now Upload the PDF document to convert to JPG in the “Choose File”Field and than click “Convert PDF to JPG button and you are done.

PDF to JPG How to Convert Free PDF to JPG Online

3.You can also get your file via Email by providing them your Email ID.

Note: You can also choose the JPG quality from the drop down menu. The higher the quality, the bigger the JPG.

PDF to JPG 2 How to Convert Free PDF to JPG Online

How to Create a Drop Down Menu In Blogger

image
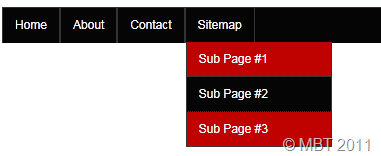
Why do you run after scripts such as jquery while you can use simple CSS and HTML to create beautiful drop down menus for your blog. I already shared a list of 30 Navigation menus and now you need to learn how to create a drop down menu in a navigation. I am sharing a simple code here that can be fully customize to make your preferred changes. So lets get to work!


Live Demo


How To Create a Drop Down Menu?

A drop down menu is needed when you have too much content on your blog or you love keeping things organized. To add a drop down menu to your blogger blogs do this:
  1. Go To Blogger > Design > Page Elements
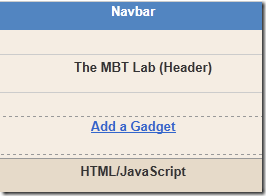
  2. Select a HTML/JavaScript Widget just under the header and paste the following code inside it,
drop down menu
<div id='mbtnavbar'>
      <ul id='mbtnav'>
        <li>
          <a href='#'>Home</a>
        </li>
        <li>
          <a href='#'>About</a>
       </li>
        <li>
          <a href='#'>Contact</a>
        </li>
  <li>
           <a href='#'>Sitemap</a>
            <ul>
                <li><a href='#'>Sub Page #1</a></li>
                <li><a href='#'>Sub Page #2</a></li>
                <li><a href='#'>Sub Page #3</a></li>
              </ul>

        </li>
      </ul>
    </div>
Replace # with your Page Links and the bolded text with relevant page names. The yellow highlighted code is responsible for the drop down menu. You can copy and paste it under any tab you want just before </li>
To add another tab just paste this code above </ul>
<li>
          <a href='#'>Tab Name</a>
        </li>
       
    3.   Now Go to Design > Edit HTML
    4.   Backup your template and search for ,
]]></b:skin>
     3.   Just above it paste the code below,
/*----- MBT Drop Down Menu ----*/

#mbtnavbar {
    background: #060505;
    width: 960px;
    color: #FFF;
        margin: 0px;
        padding: 0;
        position: relative;
        border-top:0px solid #960100;
        height:35px;
}

#mbtnav {
    margin: 0;
    padding: 0;
}
#mbtnav ul {
    float: left;
    list-style: none;
    margin: 0;
    padding: 0;
}
#mbtnav li {
    list-style: none;
    margin: 0;
    padding: 0;
        border-left:1px solid #333;
        border-right:1px solid #333;
        height:35px;
}
#mbtnav li a, #mbtnav li a:link, #mbtnav li a:visited {
    color: #FFF;
    display: block;
   font:normal 12px Helvetica, sans-serif;    margin: 0;
    padding: 9px 12px 10px 12px;
        text-decoration: none;
       
}
#mbtnav li a:hover, #mbtnav li a:active {
    background: #BF0100;
    color: #FFF;
    display: block;
    text-decoration: none;
        margin: 0;
    padding: 9px 12px 10px 12px;


}
#mbtnav li {
    float: left;
    padding: 0;
}
#mbtnav li ul {
    z-index: 9999;
    position: absolute;
    left: -999em;
    height: auto;
    width: 160px;
    margin: 0;
    padding: 0;
}
#mbtnav li ul a {
    width: 140px;
}
#mbtnav li ul ul {
    margin: -25px 0 0 161px;
}
#mbtnav li:hover ul ul, #mbtnav li:hover ul ul ul, #mbtnav li.sfhover ul ul, #mbtnav li.sfhover ul ul ul {
    left: -999em;
}
#mbtnav li:hover ul, #mbtnav li li:hover ul, #mbtnav li li li:hover ul, #mbtnav li.sfhover ul, #mbtnav li li.sfhover ul, #mbtnav li li li.sfhover ul {
    left: auto;
}
#mbtnav li:hover, #mbtnav li.sfhover {
    position: static;
}
#mbtnav li li a, #mbtnav li li a:link, #mbtnav li li a:visited {
    background: #BF0100;
    width: 120px;
    color: #FFF;
    display: block;
    font:normal 12px Helvetica, sans-serif;
    margin: 0;
    padding: 9px 12px 10px 12px;
        text-decoration: none;
z-index:9999;
border-bottom:1px dotted #333;
   
}
#mbtnav li li a:hover, #mbtnavli li a:active {
    background: #060505;
    color: #FFF;
    display: block;     margin: 0;
    padding: 9px 12px 10px 12px;
        text-decoration: none;
}
Make these changes:
  • Change #060505 to change background color of the Main menu
  • Change  the yellow highlighted text to change font color, size and family
  • Change #BF0100 to change the background of a tab on mouse hover
  • Change #BF0100 to change the background color of the drop down menu
  • Change #060505 to change the background color of drop down menu on mouse hover
      4.    Save your template and you are done!

Visit your Blogs to see a beautiful Navigation menu just below Header. Have Fun! :)
If you have any questions feel free to post them.

How to Reset Window Password

Forgot your administrator password? Don't panic, it happens to some other people too, and you have found the solution! The following instructions will show you step-by-step how to reset your local Windows password. This only works for local user accounts, however, not domain accounts.The password recovery tool from this page is written by Petter Nordahl-Hagen, and the original information, as well as the downloadable tool, can be found from his website. According to the author, this tool should work for Windows NT/2000/XP/Vista. 
WARNING! Users who have EFS encrypted files on the Windows XP or Vista computers will loose access to the EFS encrypted files after recovery of your password!

Use this trick at your own risks

The tool to reset your password can be downloaded here

I. Download the bootdisk:

  1. Download the bootdisk, which includes the password recovery tool here. The file contains the ISO CD image.
Unzip (extract) the ISO file and burn it to a CD. Note that this is an ISO file, you must burn it to CD as an ISO image, not as a "data" file. If you're not sure how, see this article. Also, the image is bootable, you need to burn the image to a CD using the image burning feature; do not extract the contents of the ISO and burn them to the CD, you'll end up with a CD that can't boot! 


II. Understanding the process:
  • You'll use the bootdisk created from the above steps to bootup your computer, which you want to reset your administrator password.
  • You'll be asked for things like: which drive is the boot drive, which path to the SAM file, etc.. but don't worry, details will be provided.
  • Once you have selected an account to reset the password, you'll need to type in a new password; however, it is highly recommended to use a BLANK password at this point, then you can change your password later in Windows.
  • Follow the prompts to the end. You'll need to save the changes at the end!


III. OK! Enough talking. Here are the steps:
  1. Startup your computer with the bootdisk created above. You should see a welcome screen following with a prompt:
     boot:
    
  2. Just wait, the bootup process will continute automatically. Then you should see a screen similar to this:
     =========================================================
     . Step ONE: Select disk where the Windows installation is
     =========================================================
     ....
     NT partitions found:
      1 :   /dev/sda1    4001MB  Boot
      2 :   /dev/sda5    2148MB
     
     Please select partition by number or
     a = show all partitions, d = automatically load new disk drivers
     m = manually load new disk drivers
     l = relist NTFS/FAT partitions, q = quit
     Select: [1]
    
  3. Notice the last line "Select: [1]" which shows the [1] as default selection because the tool detected the bootup partition is [1]. This might be different on your own machine, so you should review the list shown under "NT partitions found:". The partition with the word "Boot" should be selected.
  4. Hit Enter once you confirm the selection. You should see a similar screen as follows:
     =========================================================
     . Step TWO: Select PATH and registry files
     =========================================================
     ....
     What is the path to the registry directory? (relative to windows disk)
     [windows/system32/config] :
    
  5. Notice the last line "[windows/system32/config]" which shows the default path. This was also detected by the tool. If the path is correct, hit Enter, or if you wish to enter a different path, enter it now then hit Enter.
    Here are the paths for different versions of Windows:
    - Windows NT 3.51: winnt35/system32/config
    Windows NT 4 and Windows 2000: winnt/system32/config
    - Windows XP/2003 (and often Windows 2000 upgraded from Windows 98 or earlier): windows/system32/config
  6. Once you hit "Enter", you should see the next screen similar to the following:
     -r--------    1 0        0          262144 Jan 12 18:01 SAM
     -r--------    1 0        0          262144 Jan 12 18:01 SECURITY
     -r--------    1 0        0          262144 Jan 12 18:01 default
     -r--------    1 0        0         8912896 Jan 12 18:01 software
     -r--------    1 0        0         2359296 Jan 12 18:01 system
     dr-x------    1 0        0            4096 Sep  8 11:37 systemprofile
     -r--------    1 0        0          262144 Sep  8 11:53 userdiff
    
     Select which part of registry to load, use predefined choices
     or list the files with space as delimiter
     1 - Password reset [sam system security]
     2 - RecoveryConsole parameters [software]
     q - quit - return to previous
     [1]
    
  7. Hit "Enter" with the default option selected "[1]". Then ...:
     =========================================================
     . Step THREE: Password or registry edit
     =========================================================
     Loaded hives:   
    
       1 - Edit user data and passwords
       2 - Syskey status & change
       3 - RecoveryConsole settings
        - - -
       9 - Registry editor, now with full write support!
       q - Quit (you will be asked if there is something to save)
    
     What to do? [1] -> 1
    
  8. Hit "Enter" with the default option selected "[1]". Then ...:
     ===== chntpw Edit User Info & Passwords ====
    
     RID: 01f4, Username: <Administrator>
     RID: 01f5, Username: <Guest>, *disabled or locked*
     RID: 03e8, Username: <HelpAssistant>, *disabled or locked*
     RID: 03eb, Username: <pnh>, *disabled or locked*
     RID: 03ea, Username: <SUPPORT_388945a0>, *disabled or locked*
    
     Select: ! - quit, . - list users, 0x<RID> - User with RID (hex)
     or simply enter the username to change: [Administrator]
    
  9. Hit "Enter" with the default option selected "[Administrator]", or select another user account. Here you can enter the full user account surrounded by < and >, CASE-SENSITIVE, or enter the RID number (i.e. 0x1f4). Assuming you select the Administrator account, you should see the following screen:
     RID     : 0500 [01f4]
     Username: Administrator
     fullname: 
     comment : Built-in account for administering the computer/domain
     homedir : 
    
     Account bits: 0x0210 =
     [ ] Disabled        | [ ] Homedir req.    | [ ] Passwd not req. | 
     [ ] Temp. duplicate | [X] Normal account  | [ ] NMS account     | 
     [ ] Domain trust ac | [ ] Wks trust act.  | [ ] Srv trust act   | 
     [X] Pwd don't expir | [ ] Auto lockout    | [ ] (unknown 0x08)  | 
     [ ] (unknown 0x10)  | [ ] (unknown 0x20)  | [ ] (unknown 0x40)  | 
    
     Failed login count: 0, while max tries is: 0
     Total  login count: 3
    
     * = blank the password (This may work better than setting a new password!)
     Enter nothing to leave it unchanged
     Please enter new password: *
    
  10. At the prompt "Please enter new password", Enter the * for a blank password (HIGHLY RECOMMENDED!) then press Enter
     Please enter new password: *
     Blanking password!
    
     Do you really wish to change it? (y/n) [n] y
    
  11. At the prompt, type in "y", then press Enter. Note that the default option is "n".
     Do you really wish to change it? (y/n) [n] y
     Changed!
    
     Select: ! - quit, . - list users, 0x - User with RID (hex)
     or simply enter the username to change: [Administrator] !
    
  12. Enter the "!" to go back to the main menu. Then select "q" at the following menu to quit:
     <>========<> chntpw Main Interactive Menu <>========<>
    
     Loaded hives:   
    
       1 - Edit user data and passwords
       2 - Syskey status & change
       3 - RecoveryConsole settings
        - - -
       9 - Registry editor, now with full write support!
       q - Quit (you will be asked if there is something to save)
    
     What to do? [1] -> q
    
  13. A prompt to save changes displays, enter "y" to save:
     =========================================================
     . Step FOUR: Writing back changes
     =========================================================
     About to write file(s) back! Do it? [n] : y
    
  14. The changes are saved! You should see the following screen, press Enter, and reboot your computer.
     Writing  sam
    
     ***** EDIT COMPLETE *****
    
     You can try again if it somehow failed, or you selected wrong
     New run? [n] : n

Unlimited Bsnl Free 3G GPRS Trick July 2012

Hey friends, this time I am posting Unlimited Bsnl free 3g gprs trick. Bsnl is one of the cheapest internet provider in India. Still we don't need to pay because we're the freebies..lol. Ok to enjoy unlimited bsnl free 3g gprs trick 2012, you will have to create new proxy settings with our mentioned apn and proxy, port. So follow the steps and enjoy bsnl free gprs trick in pc and mobile both.

Unlimited Bsnl free 3g gprs trick:
Create New: GPRS Setting
Name: worldnethacks
Apn – Celloneportal
Proxy -192.168.87.163
Port - 8080

Home page – wap.yahoo.com

That's it..

Now you are ready to enjoy bsnl free 3g internet.

Enjoy.

Comment your experience.